
Do you want to build your own dining table from old wooden planks? Then you are here at DIY Furniture Blog absolutely right! I'm not a born craftsman and yet I've conjured up a rustic dining table with an industrial design. I could even upcycle old oak planks and give them a second life.
In this article, I'd like to show you exactly how I went about it and how you too can build your own DIY dining table. Let's go!
Here is a short overview for you in advance:
Planning: What do I need for a self-built dining table?
First of all, it is important to have a relatively clear picture of the future dining table in mind and to at least roughly on paper. This makes it much easier to build the dining table, as you know the exact target and don't have to make constant adjustments.
But before you make the first handshake at your tableyou should be clear about what kind of dining table you want to build yourself. By answering the following questions in advance, you will be on the safe side.
What style should the dining table have?
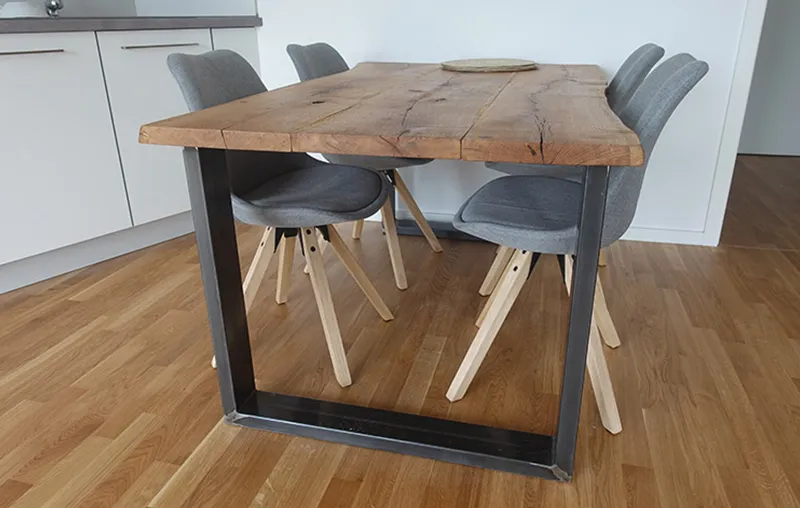
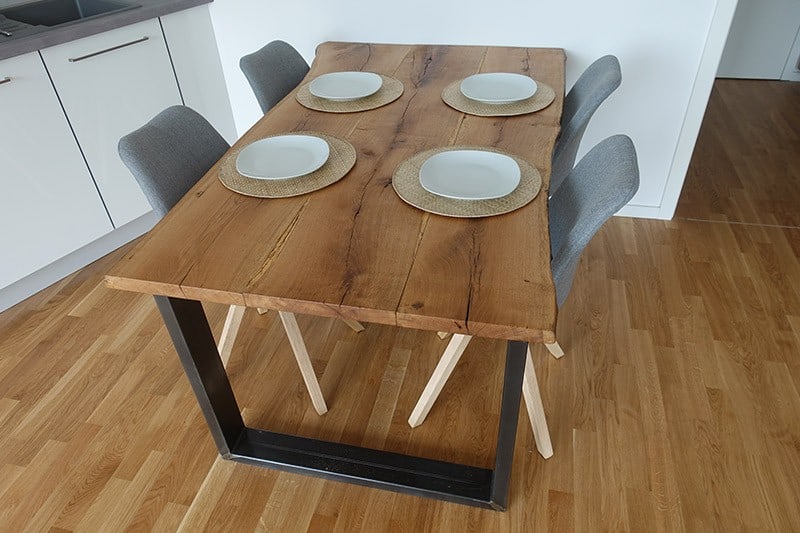
For example, would you like a simple, straight-lined dining table or would you prefer a table in the minimalist style with a touch Industrial charm? As you can see from the pictures, I opted for the latter.
Personally, I think the industrial design is just really cool - especially in combination with stone walls or black and white pictures the table can then develop a great effect.
Accordingly, it should be DIY dining table made from wooden planks and metal be used. Just two different materials. The old reclaimed oak planks and the solid table runners give the dining table a simple yet rustic look.
It was also important to me that the edges of the table, where you eat later, are not trimmed (straightened), so that the Preserve natural tree edge remains. This gives each table a truly unique touch.
Where should the dining table be placed later?
If you want to build a dining table yourself, you should be aware of the later Location be pretty clear. This is because old wooden planks in particular have a small blemish here and there.
For example, if you already know that a plank side with a quirk will be under the dining table or on the edge that will not be visible later of the dining table, you are more likely to be satisfied with it than if the material defects are in a visible place.
In addition, the future space of the DIY dining table may not be rectangular, but possibly an incline has. To ensure that the table is still parallel to other furnishings or walls, it can make sense to give one side of the table the corresponding angle of the slope.
How big do you want the DIY dining table to be?
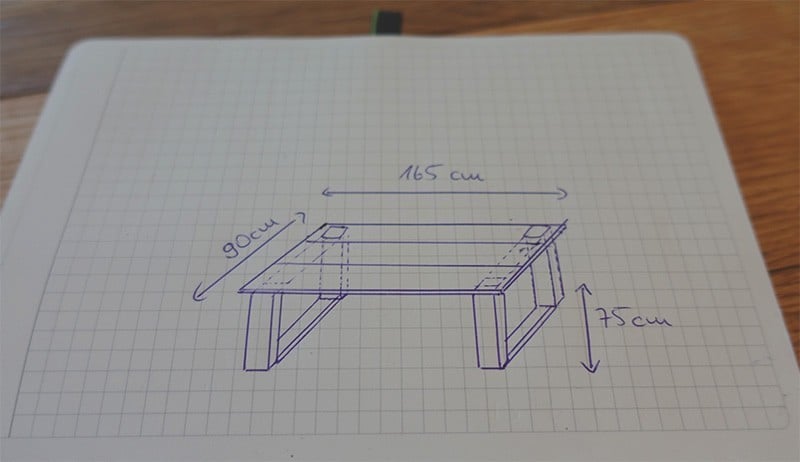
You should be pretty clear in advance how you want your self-built dining table to look later. I had decided that the table about 165 cm long, 90 cm wide or deep and 75 cm high should be. So give it some thought before you start planing, sanding and painting.
Instructions: How do I build a DIY dining table?
The idea of the dining table is ready and now it's time to get down to business! We now know which Material the dining table, which Size and in which Style it is to be built.
In the following I would now like to Step by step show you how I went about building my own dining table.
1) Get wooden planks for the dining table.
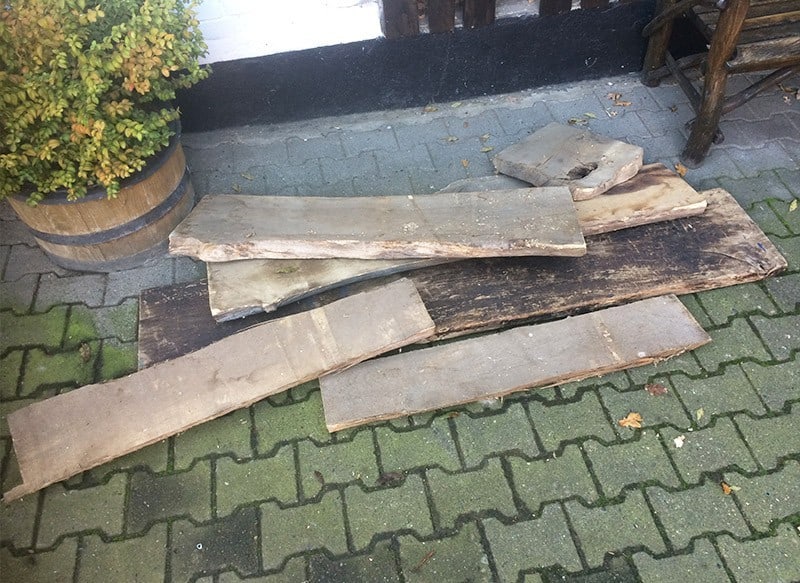
Finding the right wooden planks for the homemade dining table is actually easier in the village than in the city. Because the demand for high-quality Oak planks is now significantly higher in urban areas.
In the village, on the other hand, there are many farms where old Wooden planks lying in the attic or in the barns. I don't want to say that the planks can be found there like sand by the sea, but.... say the planks can be found there like Plastic waste in the environment. 😉
It doesn't always work! Alternative you can of course also buy or order them from a DIY store. Oak planks are available here at Obi*, for example.
Tip: When selecting used planks, it is definitely important to make sure that the wood has not yet been eaten away by woodworms and is still relatively straight. You can even out a few unevennesses later by planing.
2) Clean, plane, trim and sand planks.
You have the wood for your self-built dining table, now you just need to be processed. I proceeded as follows:
First, I made the wooden planks for the DIY dining table with the High pressure cleaner cleaned. When planks have been lying on a farm for more than 30 years, a lot of dirt can accumulate on the wood.
After cleaning, I was then able to see better whether there was still Nails or screws in the wood. A few nails were actually still in the wood, which I then removed with pliers. This is very important before planing the surface.
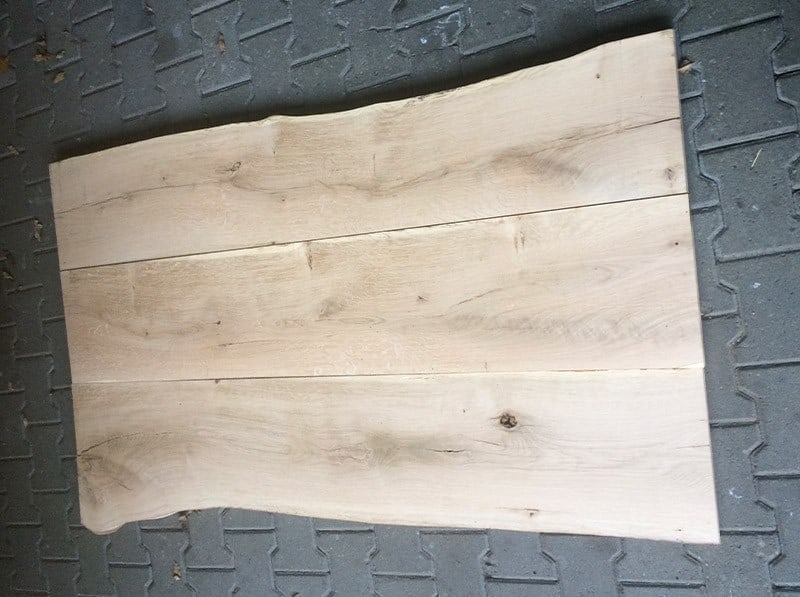
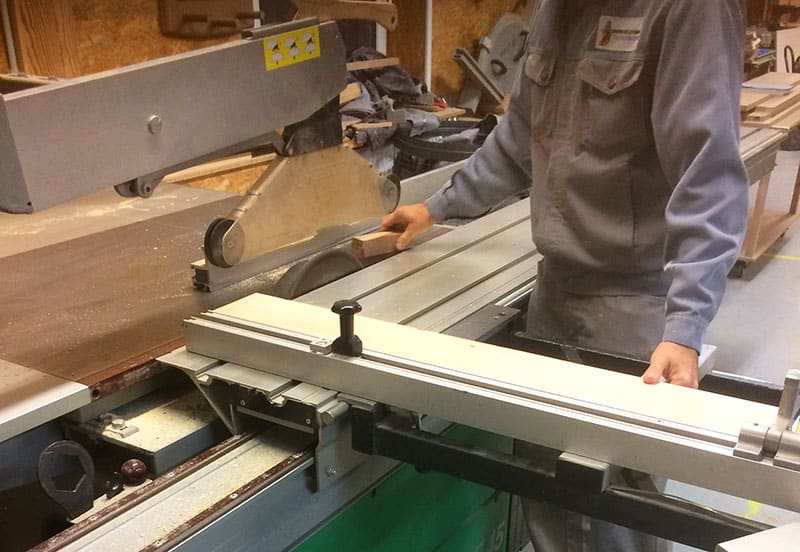
My carpenter friend has the wooden planks for the DIY dining table then smoothly planed and finally edged - except on the two outer sides, where I wanted to retain the natural tree edge. All the timbers were also cut to the Equal length Shortened.
Afterwards, the wooden planks for the DIY dining table looked like the picture above - smooth, clean and coordinated.
I then firstly used an 80 and then finally again a fine 180 to cut the wood. Sandpaper processed. Only sand the surface and the sides at the edge. You should not sand the inside of the wood and the underside, or only sand them coarsely so that no unevenness occurs at the transitions.
Also make sure that the annual rings of the planks also all point in the same direction. Why? Then the wood does not work in different directions over time and the surface remains as even as possible.
3) Order dining table metal runners in parallel.
So the foundation stone for the surface of the DIY dining table was laid. But what about the metal legs of the table? I made them while I was working on the wooden planks, commissioned or ordered. That saves a lot of time. You are guaranteed to find what you are looking for on the Internet.
You can get comparable table legs here*as I have used them.
And here is also a ready-made table frame* as an alternative.
4) Screw together dining table wooden planks
This step is of course optional, but I really recommend it to anyone who wants to build their own dining table. As already described works wood over time. This means that it bends and shifts.
Either it has already done so or it will do so. Unevenness on the surface of your wooden plank dining table is therefore inevitable.
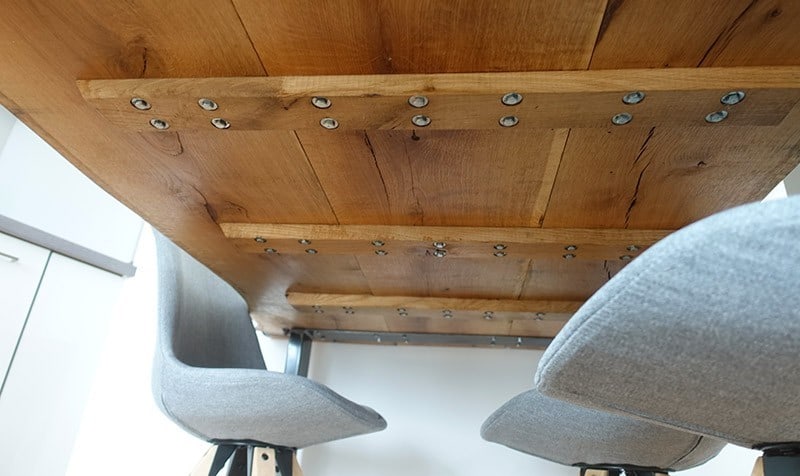
That's why I have three more Oak slats These were screwed crosswise under the three wooden planks to hold the surface together. At each transition to the next wooden plank, I tightened screws (as shown in the picture) so that the table would later be nice and even and hold together solidly.
The You can get screws online here at Obi* or at your local DIY store.
5) Paint the surface of the DIY dining table.
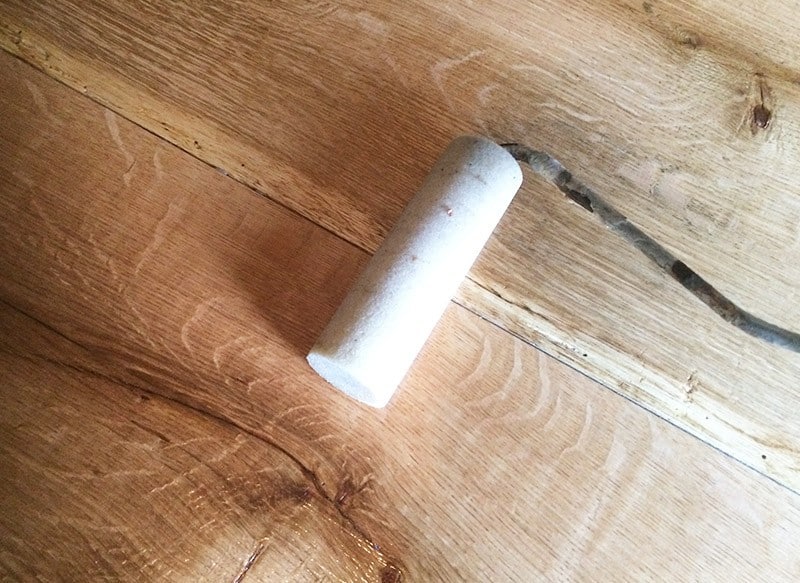
After I had sanded the surface well and finally removed the dust, it was finally ready to be painted. To preserve the natural character of the wood, I painted the wooden planks with a paint roller, a brush and a transparent hard wax oil deleted.
It protects the wood and gives the DIY dining table a slight gloss effect. After about 12 hours, the oil is dry and the surface has its final appearance.
The You can get hard wax oil here at Obi* or at any local DIY store.
6) Process metal runners and screw them with surface.
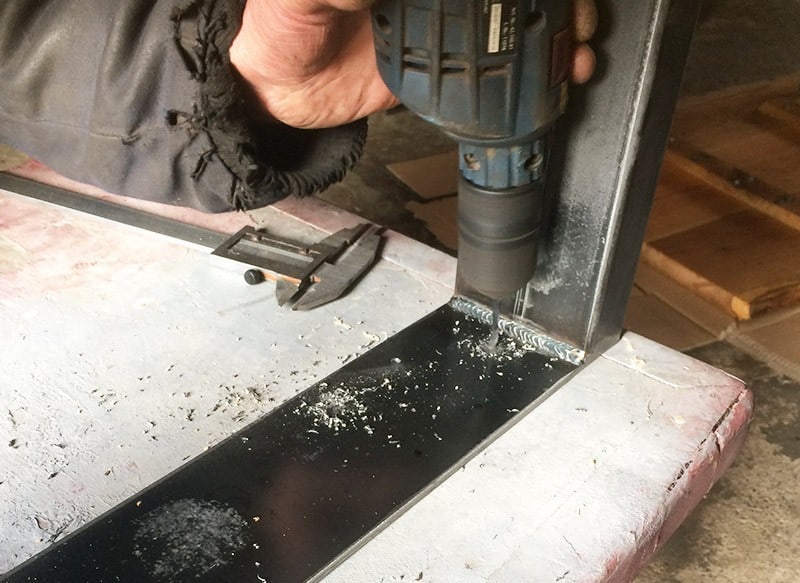
This is the final step of my DIY dining table project. In my case, I placed the metal runners on the underside of the table top as they were to be screwed on later. I then drilled holes in the metal at the appropriate points to attach the Screwing wooden planks to the metals.
Then I made the table legs short with this random orbital sander* and sanded with this transparent clear lacquer* coated.
The cool thing about joining metal and wood: When the wooden planks are pulled against the metal, the last unevenness will be evened out. If the dining table is still not completely smooth, you can loosen a few more screws and place thin boards or cardboard in between. This may involve a bit of fiddling around, but it's worth it in the end 🙂
Build your own dining table and enjoy!
Now it's done and you can sit down at your finished dining table that you built yourself according to your personal wishes. With this DIY dining table, we have - in the spirit of the Zero Waste Lifestyle reused old wooden planks and dispensed with mass-produced goods from furniture stores and lots of packaging waste 🙂
Instead, our dining room is adorned with now a real one-off with lots of industrial charm for really little money. All you need is a good plan and the desire to make things yourself.
"Not what I have, but what I do is my kingdom."
Thomas Carlyle (more at Creativity Quotes)
How do you like the self-built dining table? Do you have any questions, suggestions or further tips? Then I look forward to your comment.
Stay creative,

PS: I didn't just build the dining table myself by far and the instructions here in the Do It Yourself Blog published. From the same material I was also able to create a Coffee table and a Build desk yourself. Get some additional inspiration for your DIY furniture in the respective articles.


I want to buy a wooden table. Through the post I know that you can also easily build a table yourself. The best I will hire a carpenter for wood construction.
So it's that easy to build a free table yourself. Your finished dining table looks fantastic! Congratulations.
LG Hans Peter
Dear Christoph,
great blog and very interssanter article about DIY of furniture! Your doozy looks really great.
Have you also had experience in the field of garden furniture?
Thank you and greetings!
Hi, thanks for your great feedback on the dining table! Garden furniture is on the cards for next year when we move 🙂
Many greetings
Christoph
I want to build a wooden table myself. I have all the materials together so far, even a varnish solution for the wood at the end. Some planks I may still need. I wede times visit some farmers in the village.
I like the tip about screwing the planks together from the bottom. I have built a coffee table this way. Overall, however, it was quite expensive and time-consuming. I'm curious how long the bark will stay on. I got inspiration from a furniture restoration company. With special oils you get very nice colors.
This was an interesting article about dining tables. I want to buy some new furniture for my home. I am going to visit a cabinet shop so I can see what kind of furniture I can get for my home.
I need a new table for my kitchen. I like the idea of building the table myself. But am a klutz. would it also be possible to design a table and then have a carpenter make the table?
Hello Kyra! Sure, that's also possible. Of course, you'll have to expect a few extra costs. But then nothing wobbles afterwards 😉
Best regards
Christoph
I too think the industrial charm is best for a dining table. We have already bought our table, but your blog motivates me to build other furniture myself. If I can buy foam somewhere cheap I will try to build a sofa.
Hello Manuel! Thanks for your feedback and maximum success with your next projects!
Many greetings
Christoph
Thanks for the list of important clues before building the table. I've been wanting a table like this for a while now and I finally dare to do the craft. If need be, there is a good carpentry shop around the corner that could help me.
Hi Manuel! Thanks for your feedback and have fun building the table!
Best regards
Christoph
Hello Christoph,
first of all congratulations for such a wonderful table and thank you for the great tutorial.
I am so excited that I also want to try it.
I have already procured planks, but none could be found that are exactly straight. This will probably result in a different height of the individual planks when they leave the planer. Maybe screwing the individual planks together to different degrees will be enough to compensate for this. Have you had similar experiences or perhaps the decisive tip on this ?
If you can tell me the exact designation of the screws you used for the crossbars and for the attachment to the frame, I would be very grateful.
With kind regards
Peter
Hi Peter! Thanks for your feedback, I'm very pleased! Mine weren't totally straight either, they had been lying in a pile for years. The planing caused quite a lot to go down, so that the planks were reasonably straight in the end. Screwing them on again helped a bit. But you will never get such old planks 100% straight, because the wood continues to work well in the home. But one thing is for sure: you have an absolutely unique piece in your home 😉
Best regards
Christoph
PS: Unfortunately, I can no longer tell you which screws I used. But by the stable crossbars has the retightening really again brought what.
Hi Christoph,
Your table is really cool. Tell me, what are the dimensions of the metal runners?
Best regards
Gregor
Hey Gregor! Thank you! The "tubes" are 12 cm wide and 2.5 cm thick. But there are many different variants, so you also have some choice.
Best regards,
Christoph
Hi. Great table. How thick are the planks?
With kind regards
Hello Marco! Thank you - the wooden planks are about 3.5 cm thick.
Best regards
Christoph
I bought at a flea market old wooden planks and wanted to have them converted into a table. Since I don't have the proper tools, I will have some done. It is a good tip to make sure that there are no woodworms in the wood.
Hey Mailin! Thanks for your feedback! Always makes sense, otherwise you'll be annoyed some time later 😉
Best regards
Christoph
Hello, great instructions 🙂
How thick should the planks be approximately? In the hardware store I found some with 2.6cm, is that too thin?
LG
Hi Lina, if they are stable enough, then of course it works. In the end, it's a matter of taste - I personally find it more visually appealing when the planks are 3-4 cm thick.
Have fun with the implementation!
Best regards
Christoph
Hello,
we want to build a Gatenrisch in the same style and your tutorial is gold!
Does the table have enough stability to the side? We thought the metal parts would still have to be connected. Are the cross connections under the planks enough?
Thank you and many greetings
Anne
Hi Anne, great! Yes, it's sturdy - since metal runners and oak planks are both super hard. The crossbars are also sufficient.
Have fun and best regards,
Christoph
Hey Christoph,
Really nice table. I really want to build a similar one. Where did you get the skids?
Greetings Shady
Hi Shady! Thanks for your feedback 🙂 I found it on the big, wide internet. There's an email in the text that you can contact.
Many greetings
Christoph
Wow, this is a very nice table and a good DIY. Almost unbelievable how beautiful the table turned out when I think about the boards in the first picture.
Many love greetings
Wolfgang
Hi Wolfgang! Thanks for your feedback on the dining table. Yes, you can conjure up something beautiful from old planks like that 🙂
Best regards
Christoph
Great table! Thanks for the inspiration.
How long did it take to build the table?
Love greetings,
Nicola
Hi Nicola! Thanks for your feedback on the DIY dining table 🙂
The waiting time for the skids was 2 weeks. Worked on the surface for about a week. And all in all, it was then already finished after 2 weeks.
Best regards
Christoph
Hey Christoph, the table looks totally cool!
This is exactly what I imagine for our kitchen.
We still have some linden planks with us on "stockpile."
A DIY corner bench made of planks haste not by chance also planned?
This would be the absolute dream team for our kitchen.
Where exactly are you from in UE County?
Hi Antje! Great, thanks for your feedback 🙂
Currently there is no corner bench, but maybe after the next move.
I come from a small village near Uelzen.
I wish you every success with your projects 🙂
Best regards
Christoph
A great job! Just for my garden shed, thanks for the tips! After all, after the construction work remained some of the planks, they could be used practically. Such a table could be quite well in line with the Hälzernen wall cladding.
Super Finn! Thanks for your feedback on the DIY dining table 😉
Best regards,
Christoph
My brother has built a table out of pallets. That also looks pretty good. Pallets is now not so my case but build a table myself I'm still thinking about. I got a few wooden parts from a friend that I would like to use. Vlt I let these previously processed by a carpenter or make the feet, so that is not so heavy.
Moin Mailin,
great, hope I could give you a little extra inspiration with the DIY dining table!
Have fun with the implementation!
Greeting Christoph
Hi Christoph,
your tutorial is great, thanks for that.
How often have you oiled the wood? Does the wood structure also straighten up during oiling and then need to be sanded again?
I was able to purchase 2 ready made cast iron runners online relatively inexpensively, there were even choices in design and pre-drilled holes for the future table top.
Your projects are great, thanks for sharing.
VG Julia
Hi Julia,
thanks for your feedback! I sanded the wood sufficiently before, then painted 1x. The wood structure has not changed, so no need to sand or paint again.
Perfect, now you have everything together for the new dining table!
Have fun and best regards,
Christoph
Hello Christoph,
a really great table! Do you have problems with the table wobbling sideways? I recently built myself a very similar table, 140*80 with identical metal cams and mine moves quite a bit to the left and right....
Kind regards,
Anne
Yes Anne! Thank you for your feedback. No, nothing wobbles with me.
This is 100% due to the metal runners - they won't be completely straight or the surface will be crooked. By sticking felt stickers under the runners, for example, such problems could be solved 🙂
Many greetings,
Christoph
Hi Christoph, I'm thrilled with your instructions and would love to recreate the table.
What is the thickness of your planks? In my area, unfortunately, there are only some with 2.5cm thickness - I'm afraid that's too thin.
Hi Ina, about 3-4 cm. Even with 2.5 cm it should still work well. I'll write you another email about it.
LG Christoph
I think it's really great that you show how to make something beautiful out of old wooden boards instead of letting them rot or throwing them away.
Especially today there are hardly beautiful solid wood furniture, as they were back then. And if then so expensive that they demand half the salary :-)).
For the table that you have screwed together from these old wood panels and -gewerkelt a designer would certainly demand at least 1-2000€!!! Wonderful, the glossy color by the hard wax oil I also like very much.
Hi Isabell! Thank you for your feedback and I hope you can build yourself a similar table 🙂
Many greetings
Christoph
... I thought the dining table is self-made?! The planks are machined by carpenter, the runners were commissioned...
Apart from sanding and painting, there's not much here Do it your self! My five-year-old son can also sand and paint.
Hi Carsten! All right, then I'll order the runners from you next time 😉
I just want to give a little inspiration here and show that tables can also be built wonderfully yourself.
Best regards,
Christoph
Hello Christoph,
What a wonderful table! And your tutorial is also really great- thanks for that:)
That's exactly how I want to build it! Unfortunately, I can't find any suitable building boards near me. Ebay classifieds I already regularly scour.
Can I maybe come back to your offer you made Yannick above:)
My brother and I would like to work together on the project, so build two tables at once. Since I occasionally drive to the Lüneburg Heath, maybe something can be done?:)
That would be terrific! Because of the contact for the table legs I write you later again a mail:)
Many greetings and thanks again for the great tutorial,
Maren
Hi Maren, thanks for your feedback on the DIY dining table. Of course with pleasure! I'll just wait for your mail.
Many greetings
Christoph
Moin Moin,
I'm thrilled with your table and happen to be planning exactly the same one, with the same dimensions and everything. Now I've finally seen it! 🙂
My problem, however, is sourcing the oak planks, you wouldn't happen to have any on hand that you want to get rid of? 😀
Beautiful work!
Greeting Yannick
Hello!
Thank you for your feedback, I'm delighted 🙂
Where do you live? If you come from the district of Uelzen (Lüneburger Heide), I can certainly help you. Otherwise look at eBay classifieds in your area, you will almost always find something.
Many greetings
Christoph
Hello 🙂
I find your contribution super! However, I also have the problem to get me suitable wooden planks. How expensive would they be at your "acquaintance"`?
Love greetings
Shari
Hi Shari! Thanks for your feedback! I got them for a few euros. Of course, you always need a bit of luck. But there are lots of them lying around on old farms. Just ask around a bit or look in the classifieds 🙂
Good luck with the implementation,
Christoph
Great if you are able to make custom furniture. Unfortunately, I lack material, tools and skills. But I think it's wonderful that there are people who share their experiences.
Hi Emma, thanks for your feedback. I don't quite believe you when you link to a joinery as your website 😉 But I'll leave it at that. The article tells you exactly where you can get the materials - skills can be improved 🙂
Many greetings
Christoph
Where to put old wooden planks? Now I can easily answer the grandpa's question, thank you! He can make the similar one himself for our garden house. The living room is already decorated with a dining table made of oak, which we had built last year. Each of the relatives can now easily find their place. Thank you for your creativity!
Hi Helge! Thank you for your feedback 😉
Many greetings
Christoph
Comments are closed.